 1. How to select a suitable knitting pattern & yarn.
2. Tips on buying yarn.
3. Tips on tension/ gauge swatches.
4. How to correct uneven tension/gauge (rowing out).
5. Tips for casting on
6. Improve your long tail cast on.
7. How to join circular knitting.
8. Substituting 2 strands for a heavier weight yarn.
9. How to remove the smell from silk yarn.
10. How to prevent too tight knitting stitches.
11. Avoiding ladders when using double pointed needles.
12. Working with variegated yarns and avoiding colour pooling.
13. How to wet or steam block a knitted hat.
14. How to avoid too tight cast off.
15. How to block knitting.
 1. Choosing Knitting Patterns & Yarns to Suit Your Style

It seems obvious but thinking about our body shape and colouring before starting to knit is vital. Many knitters will know the feeling of having rushed into a purchase only to end up with something that doesn't suit us or doesn't go with anything in our wardrobe. How many of us have been seduced by a quick knit with a chunky yarn that makes us look huge? Lightweight yarns may take longer to knit up but the results are far more flattering.
Get a book that deals with choosing clothing to suit your body shape and colouring and then apply it ruthlessly. Handmade knitwear takes a lot of time and effort, let's make it worthwhile by producing knitwear that really suits us.
Finally, badly fitting knitwear doesn't flatter. So don't skip the tension swatch and don't be afraid to adjust the sleeve length etc. Top down knitting (upside down knitting) allows you to try the garment on as you go so you can adjust the fit. See Fitted Knits in our book reviews.
2. Buying Yarn
Check all the balls of yarn have the same dye lot number or you could end up with odd patches of colour.
Ignore how variegated yarn looks in the skein, try to find a pattern or picture that shows it knitted up.
3. Gauge / Tension Swatches
If you are a new or infrequent knitter don't skimp on the size of your tension swatch. Your tension is likely to change as you relax and get into your stride. It's well worth knitting a larger swatch to be sure of your tension than finding your project is the wrong size because your tension has changed. I also check my tension again after a few centimeters of my project.
4. Uneven Tension /Gauge: Rowing Out
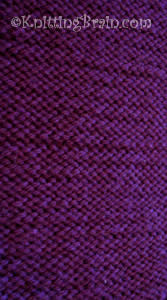 If your stocking stitch is uneven and has a stripy appearance on the reverse, as shown in the photo, then you are suffering from 'rowing out'. This is caused by a difference in tension between your knit stitches and your purl stitches.
Ideally a swatch of all knit stitches should have an identical tension to a swatch of all purl stitches. Try knitting a couple of tension squares, 1 all knit stitches and 1 all purl, to work out which is the looser stitch. You can then either tighten up or relax your knit or purl stitches to even up the tension.
The knitting in the photo was an early Knitting Brain attempt at learning continental style knitting. If you have a persistent problem with uneven tension then it may be worth trying a different knitting style.
Left handed knitters may well find it easier to control the tension with continental style knitting where the yarn held in the left hand.
As a right handed knitter I can now knit continental style but I've developed a slightly different style to the one usually taught. It took me a little while to develop an even tension, so if you're a new knitter, don't despair, practice makes perfect.
5. Casting On
Don't rush your cast on. Take the time to make sure the stitches are evenly spaced. There should be a gap, about the width of the yarn, between your stitches.
Check you are not to tugging on the working yarn at any point. Gently adjusting the tension of a stitch is one thing, but pulling the yarn tight around the needle will make knitting so much harder. It's one of those bad habits we can easily get into. Remember that stitches need a little room to move along the needle.
If you tend to cast on too tightly, try the cable cast on. You can also try the cable cast on with slightly bigger needles. Make sure you put the larger knitting needles away so you don't accidentally carry on knitting with odd needles.
6. Problems with Long Tail Cast On
There are 3 main problems with the long tail cast on: tail too short, stitches too tight or uneven stitches.
To estimate the tail length, cast on 10 stitches, then unravel and measure the length of tail yarn used. (Make sure the tail is always around your thumb as you cast on.) Multiply this up for the number of stitches you need to cast on, add a bit extra to make sure and so you can weave in the end of the yarn when finishing the project.
Alternatively, you can use 2 balls of yarn, tie the ends together and work with one ball as the working yarn and one as the tail of the yarn. Just undo the knot when you've finished casting on.
Try to form your stitches the same distance apart as they will be in the main body of the knitting. Don't try to squish the stitches together. There should be a space about the width of the yarn, between your stitches.
If you really don't like the long tail cast on you can often substitute the long tail cast on with the cable cast. The cable cast on also won't be as stretchy as the long tail cast on.
7. Joining Circular Knitting
Method 1
Cast on the required number of stitches.
Make sure the stitches aren't twisted around the needle i.e. the bottom of all the stitches should be on the inside of the circle made by your needle. This is often easier check by putting your knitting on a flat surface.
Ensure the working yarn is attached to the right hand needle place a marker on the right hand needle to indicate the beginning of the round.
Join your circular knitting by simply knitting into the stitch nearest the tip of the left hand needle. Make sure this first stitch is fairly tight by pulling gently on the working yarn.
 Method 2
Cast on 1 more stitch than you require.
Ensure the stitches aren't twisted i.e. the bottom of all your stitches should be on the inside of the circle made by your needle. This is often easier check when your knitting is on a flat surface.
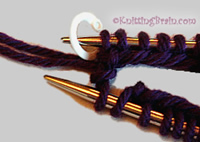
Transfer the last cast on stitch to the left needle, so the first and last cast on stitches are together at the end of the left needle and place a marker to indicate the beginning of the round, as shown in the first photo.
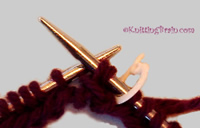 Join your knitting for working in the round by holding the yarn tail and the working yarn together and knitting the first and last stitch together, as shown in the second photo.
You will now have the correct number of stitches.
Make sure you treat this double stranded stitch as a single stitch when starting your second round.
Method 3
Cast on the required number of stitches. Ensure the stitches aren't twisted and the working yarn is coming from the right hand needle.
The first and last cast on stitches need to swap places. Slip the end stitch from the left needle onto the right needle, then slip the last cast on stitch, the one with the working yarn attached, to the left needle. Pull gently on the working yarn to ensure the tension is OK. Place marker on the right hand needle to indicate the beginning of the round and start knitting.
8. Double Strands of Yarn as Substitute for Heavier Weight Yarn
2 strands of 4-ply yarn held together can be used instead of DK, 2 strands of DK can be used instead of Aran weight and 2 strands of Aran weight can be used instead of Chunky weight yarn.
For a full list of substitutions see our yarn substitution guide.
If you use 2 different colours you can get lovely marl colour effects. See ' Knit so Fine' in our book reviews.
9. Buying Silk Yarn & Removing Smell of Silk Yarn
Occasionally silk yarn can have an unpleasant smell. Give the yarn a good sniff before buying. If buying by post check you can return the yarn if this is a major problem.
The smell is likely due to amines, chemical groups that are associated with a fishy smell. Amines are alkaline, so neutralising them should eliminate the smell. This needs to be done with care to avoid damaging the yarn.
If you've got an item already knitted or silk yarn you can't return check the care instructions, if hand washing is allowed then try hand washing in a pH balanced laundry product such as Soak. Alternatively use a pH balanced body wash or shampoo. If you live in a hard water area, then adding a few drops of clear vinegar to the rinsing water can be helpful.
If this fails, try rinsing a sample of the yarn in a bucket of cold water that contains half a teaspoon of citric acid. If all goes well you can then wash the rest of the yarn or the garment safe in the knowledge that it won't be harmed.
 10. Stitches Too Tight
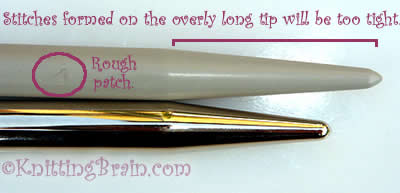
One cause of overly tight stitches is forming the stitches on the tip rather than the shaft of the needle. This is a real problem if you have knitting needles with tips that are too long. If the stitches are formed on the tapered tip then they will be too small and so too tight for the shaft of the needle.
Get yourself some good quality needles with a shorter taper or make a conscious effort to make sure your newly formed stitch is on the needle shaft before you start the next stitch. Click here for advice on buying knitting needles.
11. Ladders when Knitting in the Round
Columns of loose stitches can develop when knitting in the round on double pointed needles or 2 circular needles.
These ladders can be minimised by gently tugging the working yarn to adjust the tension after knitting the 2nd stitch of the new needle.
Remember you are just trying to ensure these stitches are the same as all the other stitches, not any tighter or looser. You are not trying to strangle the knitting needle!
12. Variegated Yarns
These can often give odd looking pools of colour. To avoid this use 2 balls at once and alternate every couple of rows. You can just carry the other strand of yarn up the side of your knitting.
Always try to see a swatch or a picture of it knitted up before you buy. Some variegated yarns look fabulous as a hank but don't look so good knitted up.
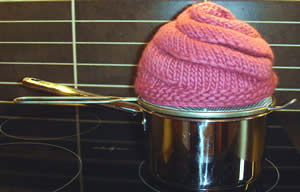 13. Blocking Knitted Hats into Shape

If stuffing the hat with tea towels and wafting your steam iron over it doesn't work you may need to take more drastic action.
You can place your hat on an upturned sieve, coax it into shape and then steam over a gently simmering pan of water.
This is the technique I used when making the snail hats featured on the knitting projects page.
14. Casting Off
If your cast off stitches are usually too tight try using a larger size needle for the cast off row.
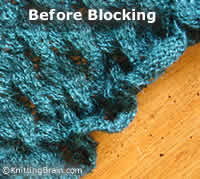 15. Blocking

Blocking can magically transform your raw knitting into a beautifully finished handmade item. It is especially important for lace knitting.
Unblocked lace knitting can look like a real mess. Only after blocking can you see the beauty of the pattern.
Make sure you use rust proof pins when blocking, getting rust marks out of your knitting is a real nightmare. Good quality stainless steel or nickel plated dressmakers pins are fine.
If you are a serious knitter or into lace knitting then invest in a set of blocking wires.
 You will need a flat surface that you can dry your knitting on and put pins in. An ironing board is fine for small items. A yoga mat or children's interlocking play mats covered with a sheet work well too.
Smooth the damp knitting and gently ease it to the correct shape and size. (See our article on how to wash knitting.)
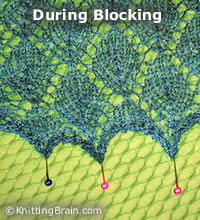
Pin around the edge to hold in shape and allow to dry. Use enough pins to prevent the edge becoming a series of peaks (unless that is what you want on a shawl for example!)
As you can see from the photos, before blocking the lace shawl looks like a scrunched up rag. Blocking magically reveals the leaf pattern stitch of the shawl.